


When Halloween comes around, my family enjoys all the festivities that come along with the holiday itself. Dressing up, trick-or-treating, pumpkin patches, and even some spooky recipes! 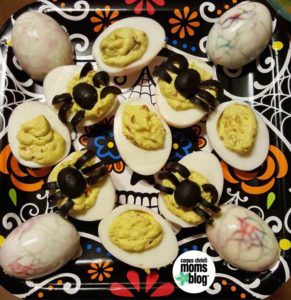
My 4 and 2 year olds LOVE to help in the kitchen. I needed to get my act together and come up with some fun, spooky Halloween food projects that we could make together.
Now, I will be the first to admit that I do not handle myself well in the kitchen. My kids have a lot of cooking “fun” with their dad, because as a family, if we had to choose who’s meal to eat… it would be his! No doubt! But, this Momma wanted to have some fun with her kiddos too!
So, the recipe we chose to make? Spider Web Eggs!
First we gathered our ingredients:
Coloring the eggs:
1 dozen eggs
food coloring
vineger
water
Filling:
egg yolks
mayo
mustard
salt and pepper
medium sized black olives
Step 1: Boil the Eggs
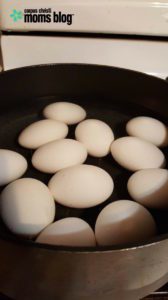 Like I said before, I’m not much of a cook. Yes, even when it comes to boiling eggs. So I went to one of my favorite ladies for advice. The Pioneer Woman. She explains how to boil eggs and peel them perfectly!
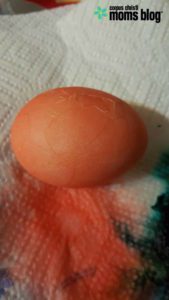
Step 2: Crack the Eggs
After boiling your eggs and setting them in the cold ice water, do NOT fully peel off the shell. Hit the side of the egg on the counter and lightly tap all around the egg so the shell stays ON the egg, but has cracks all over it. When dying the eggs with food coloring, the cracks allow the color to seep into the shell and dye colored cracks onto the egg whites for a cool effect.
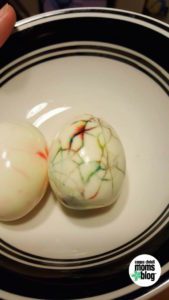
Step 3: Dye the Eggs
After cracking the egg all over, drop it into a mixture of 1/2 cup hot water, 1 teaspoon of food coloring, and 1 teaspoon of vinegar. We noticed that the darker the color, the better it showed up on our egg whites.
Here is the part where my kiddos rushed me…
Step 4: Soak the Eggs
After dropping the eggs in the food coloring, NORMALLY, you leave them in for a good while so that they really soak in the color. My kids were NOT having this… So, my eggs stayed in the food coloring anywhere from 5-10 minutes. Our spider web eggs had small amounts of “spider webs” on them for this reason. If you leave your eggs in the food coloring a little bit longer, yours may have more of the webbing effect and even turn the white of the egg another color as well!
Step 5: Peel and Prepare the Eggs
 After you dye and peel all the eggs, cut them in half and remove the yolk center. The yolk center will be used to make the yummy goodness in the center of your spiderweb egg!
To make the yolk mixture for the center, mix the egg yolk with some mayo and mustard until it is a lumpy but still creamy texture. (We added a little of each at a time so we didn’t over do it and turn the mixture into slop!) After we got it to the right consistency, we added salt and pepper to taste. I was having my 4 year old picky eater try these for the first time, so we didn’t put anything extra in them. But there are SO many different ways to season the yolk center! 
Step 6: Decorate the Eggs
After putting the yolk mixture back into the egg whites, we added a little something extra for more spookiness! I cut up medium-sized, pitted black olives so they looked like spiders and added them to some of the eggs. (My husband isn’t a fan of black olives so we left some of them without!)

Here is the finished result of our Spider Web Eggs! This was a really fun recipe for my 2 and 4 year old kiddos. They didn’t loose interest and helped me the whole way through!
For photo purposes, I left some of the egg whites whole so we could show off our “spider webs.” Also, it was a goal of mine to add some green food coloring to the yolks to add a little more spooky to them… but again, my kiddos did not want to wait so we hurried up and put the spiders on our webs!


